I'm Registered at

My Stamps


27 May, 2011
Sexy in Black

This tutorial was written by Coyotie on May 27, 2011. Any resemblance to any other tutorial is purely coincidental.
Supplies:
Tube of choice. I'm using the art work of Hunter Cazador aka The Hunter, please do not use his work unless you have the proper license to do so. You can purchase his work and obtain a license from PTE located HERE
Scrapkit of choice. I'm using a PTU kit called Wicked in Black from Kelly of Angel Designz, you can find this kit and many more awesome kits from her HERE
Filter: Xero - Porcelain
This tutorial was written with the assumption that you have a basic working knowledge of PSP. I'm using PSP X but this can be done in any other version.
Let's get started!!
Open a 600x600 transparent canvas, flood fill white
Copy and paste glitterback
Copy and paste diamondback add drop shadow
Copy and paste flowerscatter resize and move to the left, duplicate, mirror merge down and add drop shadow
Copy and paste frame2 resize and add drop shadow
Copy and paste your tube resize and duplicate drag one copy below the frame layer, on the top tube layer erase part of the bottom so it appears to be coming out of the frame add drop shadow to the bottom tube layer
Copy and paste beads resize and move to the left add drop shadow
Copy and paste corset resize and move to the bottom left add drop shadow
Hide your background layer and merge visible the rest of your layers
Apply Xero - Porcelain default settings
Crop tag
Add artist info and license #
Add name
Done!!
21 May, 2011
Gunpowder and Lead

This tutorial was written by Coyotie on 21 May, 2011. Any resemblance to any other tutorial is purely coincidental.
Supplies:
Tube of choice
Template of choice
Word art of choice
I'm using an exclusive tube and template (with word art) for PSP Party Central run by my awesome friend Mindy, please feel free to join the party by clicking HERE
EyeCandy 4000:
Marble
HSB Noise
This tutorial was written with the assumption that you have a basic working knowledge of PSP. I'm using PSP X but this can be done in any other version
Let's get started!!
Open a 600x600 transparent canvas flood fill white
Copy and paste the light rectangle and apply EyeCandy 4000 - Marble
Vein Size - 24
Vein Coverage - 76
Vein Thickness - 4
Vein Roughness - 79
Bedrock Color - White
Vein Color - Black
Random Seed - 1
Add a drop shadow
Copy and paste dark rectangle and apply EyeCandy 4000 - HSB Noise
Hue Variation - 25
Saturation Variation - 30
Brightness Variation - 40
Opacity Variation - 0
Lump Width - 28
Lump Height - 28
Wrinkled Fractal
Fractal Roughness - 50
Seamless Tile - checked
Random Seed - 1
Add a drop shadow
Copy and paste star
Selections - Select All - Float - Defloat
Copy and paste your tube and move over top of star
Selections - Invert - Hit delete key
Selections - Select None
Change blend mode to multiply
Add a drop shadow to both the tube and the star
Copy and paste the 2 "Gunpowder" layers merge down add a drop shadow and move to the top of the rectangles
Repeat the last step for the "and Lead" layers but move these to the lower right of the rectangles
Copy and paste your tube resize and place to the left and add a drop shadow
Crop your tag
Add your artist info and license #
Add your name
Done!!
18 May, 2011
Sparkling Hot

This tutorial was written by Coyotie on May 17, 2011. Any resemblance to any other tutorial is purely coincidental.
Supplies:
Tube of choice. I'm using the art work of Jose Cano, please do not use his work unless you have the proper license to do so. You can purchase his work and obtain a license from PTE located HERE
Scrapkit of choice. I'm using a PTU kit called Lollipop Porn from my very awesome friend Kaci of Scrappin Krazy Designs. You can find this kit and many more awesome kits from her HERE
Vix_Mask168 located HERE
This tutorial was written with the assumption that you have a basic working knowledge of PSP. I'm using PSP X but this can be done in any other version
Let's get started!!
Open a 600x600 transparent canvas, flood fill white
Copy and paste paper apply mask resize, merge group and add drop shadow
Copy and paste doodle, duplicate, mirror, resize and add drop shadow
Copy and paste flames move to the right, duplicate, mirror, merge down and add drop shadow
Copy and paste cuffs resize really small move to upper left and add drop shadow
Copy and paste shadow, resize move to lower left and add drop shadow
Copy and paste tube resize place where desired and add drop shadow
Crop tag
Add artist info and license number
Add name
Done!!
17 May, 2011
Sexy Spring

This tutorial was written by Coyotie on April 27, 2011. Any resemblance to any other tutorial is purely coincidental.
Supplies:
Tube of choice. I'm using the artwork of Keith Garvey, please do not use his work unless you have the proper license to do so. You can purchase his work and obtain a license from PTE located HERE
Scrapkit of choice. I'm using a PTU kit called Lil Bo Peepers by my wonderful friend Shani of Wicked Princess Scraps. You can find this kit and many more awesome kits from her HERE
Vix_Mask37 you can find this mask HERE
This tutorial was written with the assumption that you have a basic working knowledge of PSP. I'm using PSP X but this can be done in any other version
Let's get started!!
Open a 600x600 transparent canvas and flood fill white
Copy and paste paper apply mask resize by 80 and merge group
Adjust - Add/Remove Noise - Add Noise
50%
random
monochrome - checked
Copy and paste pearl swirl resize and drag below mask layer and lower opacity to 40
Copy and paste rainbow resize and move to the left
Copy and paste cloud move up and over rainbow
Copy and paste branch resize move to left and add drop shadow
Copy and paste tall grass resize move down and add drop shadow
Copy and paste tube resize and move over top of the grass and add drop shadow
Crop tag
Add artist info and license number
Add name
Done!!
Toxic Love
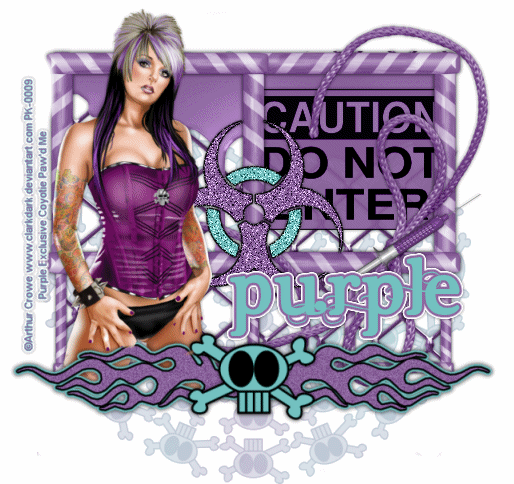
This tutorial was written by Coyotie on May 17, 2011. Any resemblance to any other tutorial is purely coincidental
Supplies:
Tube of choice. I'm using and Exclusive tube by Arthur Crowe, please do not use his work unless you have the proper license to do so. You can purchase his work and obtain a license from PTE located HERE
Scrapkit of choice. I'm using a PTU kit called Toxic Candy by my awesome friend Kerry of Purple's Kits, you can find this kit and many more awesome kits from Kerry HERE
Mask used in this tutorial can be found in the kit above
Let's get started!!
Open a 600x600 transparent canvas and flood fill white
Copy and paste paper, apply mask resize by 80 and merge group
Copy and paste wire resize by 53
Copy and paste frame resize by 53 move up and add drop shadow, erase the wire from around the frame
Copy and paste drips1 drag below frame layer move to the top of the frame and erase any excess and add drop shadow
Copy and paste line2 resize and move to the center bottom of the frame add drop shadow
Copy and paste string drag below line layer and move to the right of the frame add drop shadow and erase the bottom part of the string up to the line
Copy and paste syringe move to right over top of the knot of the string add drop shadow
Copy and paste tube resize and place where desired and add drop shadow
Copy and paste caution sign move to upper right square of the frame and drag below frame layer add drop shadow
Copy and paste bio-hazard sign resize by half move to the middle of the frame drag below tube layer and erase just the tips so it appears to be wrapping around the bars of the frame add drop shadow
Crop tag
Add artist info and license number
Add name
Done!!
Tattoo Me

This tutorial was written by Coyotie on April 27, 2011. Any resemblance to any other tutorial is purely coincidental.
Supplies:
Tube of choice. I'm using the artwork of Keith Garvey, please do not use his work unless you have the proper license to do so. You can purchase his work and obtain a license at PTE located HERE
Scrapkit of choice. I'm using a PTU kit called Tattoos N Piercings made by my awesome friend Kerry of Purple Kreations...you can find this kit and many more awesome kits from her HERE
This tutorial was written with the assumption that you have a basic working knowledge of PSP. I'm using PSP X but this can be done in any other version.
Let's get started!!
Open a 600x600 transparent canvas and flood fill white
Copy and paste frame resize, using the magic wand tool click inside the frame
Selections - Modify - Expand by 6
Copy and paste paper
Selections - Invert -hit delete key
Selections - Select None
Drag below frame layer
Repeat this step using the wire
Repeat this step again using a close-up of your tube (if one is available) in place of the paper, change blend mode to Luminance (legacy) and make sure your opacity is at 100%. Add a drop shadow to the frame
Copy and paste both patches and place at bottom of frame, merge down and add a drop shadow
Copy and paste Charm 1 and move to the bottom middle and add drop shadow
Copy and paste nipple bar, move to upper left corner of frame, duplicate and drag one copy below the frame, on the top layer erase the middle section of the bar so it appears to be running through the chain, add drop shadow to the bottom copy
Copy and paste butterfly wings, add drop shadow and drag below paper layer
Copy and paste tat4 move to the bottom middle and drag below the patches layer
Copy and paste rose drag below your close-up and move left and down, erase any of the stem that appears at the bottom add drop shadow
Copy and paste sign move to bottom and drag below the charm layer
Crop tag
Add artist info and license number
Add name
Done!!!
09 May, 2011
Elias Easter Bunny

This tutorial was written by Coyotie on April 25, 2011. Any resemblance to any other tutorial is purely coincidental.
Supplies:
Tube of choice..I'm using the work of Elias Chatzoudis, please do not use his work unless you have the proper license to do so. You can obtain his work and a license from PSP Tubes Emporium found HERE
PTU Kit called Happy Easter from Crazy Girl at Digital Chaos found HERE
Vix_Mask37 found HERE
This tutorial was written the assumption that you have a basic working knowledge of PSP. I'm using PSPX but this can be done in any other version.
Let's get started!!
Open a 600x600 transparent canvas and flood fill white
Copy and paste your paper and apply your mask, merge group
Adjust - Add/Remove Noise - Add Noise
Random
50
Monochrome checked
Resize this layer by 80
Copy and paste bling doodle, move slightly to the left, duplicate - merge down, duplicate again and mirror
Copy and paste your candle and resize, move to bottom left add a drop shadow
Copy and paste your tube resize and place so it looks like the tube is either sitting or leaning on the candle, add a drop shadow
Copy and paste rabbit 1 move to the lower right add a drop shadow
Copy and paste your flower resize and move to the top of the rabbit so it looks like it's sitting between the ears...add drop shadow
Copy and paste balloon move to the candle and move below the candle layer....add a drop shadow
Crop your tag
Add your artist info and license #
Add your name
Done!!
Subscribe to:
Posts (Atom)
About Me

- Kellie G.
- I'm Kellie and I'm just a simple girl who loves to read and travel. Mom of 5 and Independent Distributor for It Works! Global.
I CT For


My Blinkie


Sites I Prowl


My Licenses


My CU Licenses


