Labels
- AIL (7)
- Angels Designz (6)
- Blog Layouts (8)
- Broken Dreamz (1)
- Broken Sky Dezine (2)
- Coyotie Designs Exclusives (2)
- Crazy Girl (2)
- E-Mag Previews (1)
- Forum Sets (2)
- PSP Party Central (1)
- PSP Party E-Mag (1)
- Purples Creations (7)
- Scrap Kits (3)
- Scrappin Krazy Designs (9)
- Scraps From The Heart (7)
- Wicked Princess (4)
My Badges
Powered by Blogger.
My Stalkers
22 November, 2011
Star Struck Babez
This tutorial was written by Coyotie on 22 Nov, 2011. Any resemblance to any other tutorial is purely coincidental
Supplies:
6 tubes of choice, I'm using the artwork of Keith Garvey. Please DO NOT use his work unless you have the proper license to do so. You can purchase his work and obtain a license at PTE
Scrap kit of choice. I'm using a PTU kit called Star Struck made by my wonderful friend Kaci of Scrappin Krazy Designs. You can purchase this kit and many more awesome kits from HERE
This tutorial was written with the assumption that you have a basic working knowledge of psp. I'm using PSP X2 but this can be done in any other version
Let's get started!!
Open a 600x600 transparent canvas - flood fill white
Copy and paste the 6 square frame - using the magic wand click inside one of the squares - expand by 5 - copy and paste one of your tubes - move the tube till the part you want is inside the marching ants - invert - delete - deselect - add drop shadow to the tube part and drag below the frame layer
Repeat the last step for the other 5 frames - add a drop shadow to the frame - hide your white background - merge visible - unhide the white background
Copy and paste ele23 - add drop shadow - drag below your combined frame layer
Copy and paste pink glitter - drag below ele23
Copy and paste silver glitter - drag below pink glitter layer - move down - duplicate - flip
Copy and paste pink glitter garland - send to top - move to the bottom of the frame - add drop shadow
Copy and paste flame - resize - move to bottom left - duplicate - mirror - merge down - add drop shadow - drag below garland layer
Copy and paste your main tube - resize if needed - position where desired - add drop shadow
Crop tag
Add artist info and license #
Add name
Done!!
Labels:
Scrappin Krazy Designs
21 November, 2011
Sinful Darkness
This tutorial was written by Coyotie (with help from her daughter Crystalyn) on 21 Nov, 2011. Any resemblance to any other tutorial is purely coincidental
Supplies:
Tube of choice, I'm using the artwork of Keith Garvey. Please DO NOT use his work unless you have the proper license to do so. You can purchase his work and obtain a license at PTE
Scrap kit of choice. I'm using a PTU kit called Raven by my very wonderful friend Kaci of Scrappin Krazy Designs. You can purchase this kit and many more awesome kits from Kaci HERE
This tutorial was written with the assumption that you have a basic working knowledge of psp. I'm using PSP X2 but this can be done in any other version
Let's get started!!
Open a 600x600 transparent canvas - flood fill white
Copy and paste paper of choice - apply mask - merge group
Copy and paste bow - move to the top of the mask - add a drop shadow
Copy and paste envelope - move to upper right corner - add drop shadow - drag below the ribbon layer
Copy and paste pin - resize - move to envelope flap - erase 2 parts of the pin so it appears to be piercing the paper - add drop shadow
Copy and paste blackrose - resize - add drop shadow - move to lower right corner of the envelope
Copy and paste purple flower - resize - add drop shadow - move over top of the black rose
Copy and paste white flower - resize - move over top of the knot in the bow - add drop shadow
Copy and paste key - mirror - move to right side - erase part of the ribbon so that it appears to be running through the key - add drop shadow
Copy and paste bird - move somewhere over the pin - add drop shadow
Copy and paste heart - resize - move over top of envelope seal - add drop shadow
Copy and paste feather - resize - move to lower left corner of envelope - add drop shadow
Copy and paste your tube - resize if needed - position where desired - add drop shadow
Crop tag
Add artist info and license #
Add name
Done!!
Labels:
Scrappin Krazy Designs
Wicked Christmas
This tutorial was written by Coyotie on 21 Nov, 2011. Any resemblance to any other tutorial is purely coincidental.
Supplies:
Tube of choice. I'm using the amazing artwork of Freya Langford-Sidebottom, please DO NOT use her work unless you have to proper license to do so. You can purchase her work and obtain a license from AIL
Scrap kit of choice, I'm using a PTU kit called Winter Sweet Fantasy from Dnscraps of Scraps from the Heart. You can purchase this kit and many other awesome kits from her HERE
This tutorial was written with the assumption that you have a basic working knowledge of psp. I'm using PSP X2 but this can be done in any other version
Let's get started!!
Open a 600x600 transparent canvas - flood fill white
Copy and paste snow - resize - add a subtle drop shadow
Copy and paste leafs5 - resize - add drop shadow
Copy and paste snows - resize - add drop shadow - drag below snow layer
Copy and paste wordartmagic - resize - move to the bottom of the canvas as I've done
Copy and paste leafs2 - resize - add drop shadow - move to over top the word art - drag below word art layer
Copy and paste chains2 - resize - add drop shadow - drag below word art layer
Copy and paste wordart2 - resize - add drop shadow - move to top left of canvas
Copy and paste tube - resize - position where desired - add drop shadow
Copy and paste silverleafs - resize - add drop shadow - move to left - drag below wordartmagic layer
Copy and paste embellement2 - resize - flip - move to upper right corner
Crop tag
Add artist info and license #
Add name
Done!!
Labels:
Scraps From The Heart
19 November, 2011
SILVER AND GOLD TAG CONTEST!!!!
The new PSP Party E-Mag is having a tag contest!!!!
Come and join us in the Silver and Gold tag contest....the link to all the details is below
and come like our fan page on Facebook....located HERE
All winners will be posted in the Dec. issue of PSP Party E-Mag!!!!
Labels:
PSP Party E-Mag
14 November, 2011
All Wet

This tutorial was written by Coyotie on Nov 11, 2011. Any resemblance to any other tutorial is purely coincidental.
Supplies:
Tube of choice. I'm using the artwork of Keith Garvey, please DO NOT use his work unless you have the proper license to do so. You can purchase his work and obtain a license at PTE
Filters:
Eye Candy 4000 - Gradient Glow
Drip
PhoteEffex - Scanlines
This tutorial was written the assumption that you have a basic working knowledge of psp. I'm using PSP X2, but this can be done in any other version
Let's get started!!!
Open a 600x600 transparent canvas - flood fill white
Pick a color from your tube - set foreground to this color and your background to black
Using your preset shapes tool - rectangle -width set at 5 - draw out a good sized sideways rectangle - convert to a raster layer - using your pick tool - set to perspective - click and hold the lower right corner and move up and left slightly so that your rectangle appears to be angling away from you
Select all - float - defloat - expand by 5 - new raster layer - flood fill white your tube color - apply scanlines - default settings but clicking vertical toggle - add a drop shadow - drag below your rectangle layer
Highlighting back on your original rectangle layer - apply Eye Candy drip - settings of your choice - add a drop shadow - select all - float - defloat - copy and paste a close-up of your tube - move to the left of rectangle - invert - hit your delete key - deselect - change blend mode to screen and lower opacity to 50
Copy and paste your tube - move to the right of your rectangle - add a drop shadow
Add word art of your choice - apply scanlines:
width - 3
spacing - 1
dark band strength - 39
light nonband strength - 64
noise amount - 0
darkness/lightness - 255
verticle toggle - checked
apply a gradient glow - add a drop shadow - apply drip - same settings but click random once
Crop tag
Add artist info and license #
Add name - applying the same scanlines, drip, and gradient glow that were used before
Done
Labels:
Coyotie Designs Exclusives
11 November, 2011
Tow the Line Forum Set


This tutorial was written by Coyotie on Nov. 11, 2011. Any resemblance to any other tutorial is purely coincidental
Supplies:
Tube of choice (one with a close-up if possible). I'm using the artwork of Keith Garvey, please DO NOT use his work unless you have the proper license to do so. You can purchase his work and obtain a license at PTE
Filters: Tramages - Tow the Line - default settings
Eye Candy 4000 - Gradient Glow
This tutorial was written with the assumption that you have a basic working knowledge of psp. I'm using PSP X2, but this can be done in any other version
Let's get started!!
Open a 600x250 transparent canvas - flood fill white
New raster layer - flood fill with a dark color from your tube - apply Tramages Tow the line - default settings
New raster layer - flood fill with a light color from your tube - change blend mode to dodge and lower the opacity to 60
Copy and paste your tube - drag below your light color layer - change the blend mode to multiply - duplicate - mirror
Copy and paste the close-up of your tube - apply Eye Candy 4000 - Gradient Glow - glow width at 3 - color settings - fat and color should be the same as the light color from your tube - add a heavy drop shadow
New raster layer - set your foreground to a gradient using the same light color as before - flood fill this layer with your gradient - send to top - select all - contract by 8 - hit the delete key - adjust - add/remove noise - add noise - uniform - 50 - monochrome checked - deselect - add a heavy white drop shadow
Add your artist info and license #
Add your name
Copy
AVATAR:
Open a new transparent canvas - 150x150
Paste as a selection on your 150x150 canvas - move over till the upper left corner is in the canvas box - click - this will come up as a floating selection - defloat - select
Add artist info and license #
Add name or intitials
Done!!!!
Labels:
Forum Sets
07 November, 2011
Flame On

This tutorial was written by Coyotie on Nov. 6, 2011. Any resemblance to any other tutorial is purely coincidental
Supplies:
Tube of choice. I'm using the artwork of Keith Garvey. Please DO NOT use his work unless you have the proper license to do so. You can purchase his work and obtain a license at PTE
Scrap kit of choice. I'm using a PTU kit called Fireball by Kaci of Scrappin Krazy Designs
Mask - Vix_Mask_Valentine8
Filters - Xenoxfex - Constellation: Settings as follows
7.51
49
50
29
51
77
twinkle rotation 45
keep original checked
random seed 1172
This tutorial was written with assumption that you have a basic working knowledge of psp. I'm using PSP X2 but this can be done in any other version
Let's get started!!
Open a 600x600 transparent canvas - flood fill white
Copy and paste paper of choice - apply mask - merge group - duplicate
on the bottom copy apply gaussian blur: radius 8.00 - apply constellation with the above settings
on the top copy resize by 95%
Copy and paste wire - move up slightly and drag below both mask layers
Set your foreground color to pattern and find the paper you used - set your background color to nil - using your elipse preset shape width set at 5 draw out a medium sized sideways oval - center in canvas and convert to a raster layer
Using your magic wand tool click inside the frame that you just made - expand by 3 - copy and paste a close up of your tube - invert and hit the delete key - drag below your frame layer and add a drop shadow - duplicate and merge down - duplicate and mirror
on the bottom copy apply gaussian blur - radius 6.00 - change opacity to 50
on top layer change blend mode to lighten
Copy and paste your tube - resize - add a drop shadow - duplicate and drag one copy below your frame layer - hide the top copy
on the bottom copy erase the bottom part of your tube to the frame
unhide the top copy and on this copy erase the same bottom portion of your tube so it appears to be coming out of the frame
Copy and paste flame - resize -drag between your top tube layer and your frame layer - move down slightly - erase and parts that appear on your tube - add a drop shadow
Copy and paste flame boot - resize - move to the right - add a drop shadow
Crop tag
Add artist info and license #
Add name
Done!!
Labels:
Scrappin Krazy Designs
Wicked Ways

This tutorial was written by Coyotie on Nov. 5, 2011. Any resemblance to any other tutorial is purely coincidental.
Supplies:
Tube of choice. I'm using the artwork of Gary Rudisill, please DO NOT use his work unless you have the proper license to do so. You can purchase his work and obtain a license at PSP Asylum
Scrap kit of choice. I'm using a PTU kit called Mysti Night by Dnscraps of Scraps from the Heart
Mask - Vix_Mask436
This tutorial was written with assumption that you have a basic working knowledge of psp. I'm using PSP X2 but this can be done with any other version
Let's get started!!
Open a 600x600 canvas flood fill white
Copy and paste paper of choice apply mask
Copy and paste moon - resize and move up slightly
Copy and paste wicked2 box - resize - move to bottom - add drop shadow
Copy and paste word art - resize - place over wicked2 box - add drop shadow
Copy and paste curtains - resize - move to left of wicked2 box - add drop shadow - duplicate and mirror
Copy and paste your tube - resize if needed - add drop shadow - move to top of wicked2 box
Crop tag
Add artist info and license #
Add name
Done!!
Labels:
Scraps From The Heart
01 November, 2011
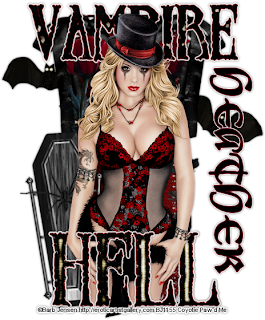
Vampire Hell

This tutorial was written by Coyotie on Nov. 1, 2011. Any resemblance to any other tutorial is purely coincidental
Supplies:
Tube of choice. I'm using the artwork of Barbara Jensen, please DO NOT use her work unless you have the proper license to do so. You can purchase her work and obtain a license directly from Barb HERE
Scrap kit of choice. I'm using a PTU kit called Vampire Hell from Dnscraps, you can purchase this kit at Scraps From The Heart
Plug-ins:
EyeCandy 4000 - Gradient Glow
This tutorial was written with assumption that you have a basic working knowledge of psp. I'm using PSPX but this can be done in any other version
Let's get started!!
Open a 600x600 transparent canvas, flood fill white
Copy and paste tag2 resize by 65% add a drop shadow
Copy and paste your tube, resize if needed and place towards the bottom of the tag add a drop shadow
Copy and paste rose resize by 80% free rotate left by 90 degrees place to the right of your tube add a drop shadow, drag below your tube layer duplicate and mirror
Copy and paste bow resize to the top right corner of the tag drag below both rose layers add a drop shadow duplicate and mirror
Copy and paste word art 2 resize move to top and drag below your tube layer
add a gradient glow and a drop shadow
Copy and paste word art 5 repeat the above step but move the word art to the bottom
Copy and paste the coffin resize move to the left and up slightly drag below tube and word art layers add a drop shadow and move to the bottom layer
Copy and paste spider resize move to the left drag to just above the coffin layer and place so it appears to be on the coffin add a drop shadow
Crop your tag
Add artist info and license #
Add name
Done!!
Labels:
Scraps From The Heart
Bloodlines

This tutorial was written by Coyotie on Nov. 1, 2011. Any resemblance to any other tutorial is purely coincidental
Supplies:
Tubes of choice (one with a close up if possible). I'm using the artwork of Keith Garvey, please DO NOT use his work unless you have the proper license to do so. You can purchase his work and obtain a license at PTE
Scrap kit of choice. I'm using a PTU kit called Sacrifice made by Dnscraps, you can purchase this kit at Scraps From The Heart
This tutorial was written with the assumption that you have a basic working knowledge of psp. I'm using PSPX but this can be done in any other version
Let's get started!!
Open a 600x600 transparent canvas and flood fill white, apply mask resize by 75% and merge group
Copy and paste metal frame, resize by 65%, using your magic wand tool click inside the frame expand by 10, copy and paste your tube closeup invert and hit the delete key, drag the tube layer below the frame layer and add a drop shadow to both the tube and frame layers, drop tube opacity to 65
Copy and paste double hearts drag below mask layer move up slightly and add a drop shadow
Copy and paste word art 5 resize buy 65%, move to bottom of frame and add a drop shadow
Copy and paste cross2 resize by 65% change blend mode to overlay and drop opacity to 85 and drag below word art layer
Copy and paste both tubes resize if needed place where desired add a drop shadow to both
Crop your tag
Add artist info and license #
Add name
Done!!
Labels:
Scraps From The Heart
Subscribe to:
Comments (Atom)
About Me

- Kellie G.
- I'm Kellie and I'm just a simple girl who loves to read and travel. Mom of 5 and Independent Distributor for It Works! Global.


